 World of O News

Ever wanted to get orienteering maps on your GPS device, and see exactly where you are using the GPS? Read on to see how you can convert any OCAD file to a Garmin map which you can use on your Garmin GPS unit supporting Garmin .img maps – using freely available software. On your GPS unit you can then use the generated map in the same way as any other Garmin map – showing your position on the map, aligning the map correctly, panning and zooming.
This article is the first in a series about GPS and orienteering here at WorldofO.com, exploring what new technology can do to get orienteering and orienteering maps out to more people. This first article considers the conversion of any OCAD-file to a Garmin map – usable for most Garmin GPS units which have a map mode. The second article considers how to show orienteering maps on the newest Garmin GPS units (Oregon / Dakota) as raster maps using a much more straightforward procedure taking you only a few minutes for a map. The third article considers showing your position on a modern mobile phone with GPS receiver (e.g. the Iphone or an Android phone).
Why orienteering map on a GPS?

There are several reasons why you would want to be able to use orienteering maps on a GPS receiver.
- To get young people interested in orienteering. Technology may be an extra motivation – this goes especially for boys, but we’ve seen the same for girls as well. The GPS receiver is a gadget which catches the interest of youngsters immediately, and is a good way to introduce youngsters to orienteering. We got a lot of positive feedback from 8-12 year old who had not tried orienteering before, who thought this was super cool.
- Orienteering maps on a GPS receiver is an excellent way to better teach young people orienteering, as they can better see the relation between map and terrain when there is a dot on the map showing them where they are at any given moment.
- This has proven to be very instructive for 8-10 year old, who we have observed understanding the different map symbols very fast when using a GPS.
- Another interesting use was to let one of our 16-year old runners who is quite new in the sport run a course with a GPS with the orienteering map and course loaded – Instead of focusing on where I was, I could concentrate on where to run to the next control. I could run a lot faster as I always knew where I was, and feel like a real orienteer, he said afterwards.
- A third use of a GPS with orienteering map among youngsters has been to let beginners who try a more difficult course for the first time bring a GPS with them as a security, being instructed to only take a look at it if they are really lost. Usually they won’t need it at all, but it makes it easier for them to take the step up from beginner to the next level.
- Make orienteering maps useful and accessible for people outside the orienteering community. Orienteering maps are superior to most maps available for GPS’es today for hiking purposes. There is both a big market – and a big possibility for getting people interested in orienteering and understanding orienteering maps.
- For mapmakers it is very useful to transfer the draft map to the GPS, and bring the GPS to the forest and field check the map. This has been done quite a lot among map makers in New Zealand (and maybe also elsewhere).
- Potentially, GPS units with orienteering maps could be used in normal orienteering competitions as well. My personal opinion is that that should be forbidden. One might make special categories for GPS orienteering in the future, but a mix of GPS and non-GPS orienteering would not be good.
The work described in this article is mostly done while I was working in the orienteering club Varegg. In our particular case, the interest was in getting youngsters interested in orienteering – and learning them how to understand and use an orienteering map. With founding from Gjensidigestiftelsen and some funding from the Norwegian Orienteering Federation, Varegg had the possibility to buy a set of 10 Garmin Oregon 300 GPS units and develop a method to convert orienteering maps to maps which could be used on the GPS units.
The GPS units have been used – and will further be used – in activities directed towards youngsters, both to get new youngsters interested in orienteering, and to improved the map understanding of the youngsters in the club.
Another interest in the future is to work on making orienteering maps useful and accessible for people outside the orienteering community. In particular, there are interesting possibilities for the “Tur-orientering” concept when orienteering maps can be used directly on a GPS unit or especially on a mobile phone with GPS receiver.
What does it look like?

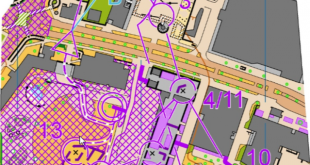
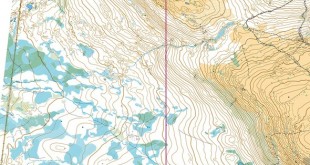
In the embedded video below you see an example of the usage of an orienteering map converted from OCAD to Garmin map on an Oregon 300 GPS unit. As you can see, this looks like a orienteering map – you get to see your position on the map, and it is possible to zoom and pan the map. You may also let the map automatically align to the direction you are moving.
This first article in the series considers conversion of OCAD maps to Garmin maps (.img-files). These Garmin maps should be usable on a number of GPS units like e.g. the Garmin Oregon series, Garmin Colorado series, Garmin Dakota series, Garmin GPSMAP-series, Garmin eTrex-series and Garmin Edge 605/705 (Note! Has only been tested on Garmin Oregon and Garmin GPSMAP so far). The resulting Garmin maps are vector maps which behave exactly like any other Garmin maps. It is, however, not straightforward to get the maps to look exactly like an orienteering map, although it is possible to get quite close.
In the next article in this series we will consider raster maps which you can get to look exactly like an orienteering map – these do however only work on the Oregon, Dakota and Colorado series of GPS units.
Conversion details (Warning: Technical!)
Now we’ve shown that it works – and it is time to get down to the technical details. Note that you will need an OCAD-file of the map to convert to proceed with the procedure. This gets very technical – so most of you should probably stop reading here. If you are lucky enough to have a Oregon, Dakota or Colorado unit, you may rather want to wait for the next article in this series which tells you how to use raster maps on the GPS units. The procedure is a lot easier to follow – and the map on the GPS will look exactly like the orienteering map.
Note that the method described here is kind of a hack – and can not even be regarded as an alpha version – but it has worked for me for a number of maps, and I decided to share it with everybody in case somebody want to use and/or improve it. Only the basics are included for now. If you see improvements to the procedure, please add a comment below to let people know about it. If you are trying to get things to work and have problems, please do not send me an email, but rather add a comment below as that may then help others having the same problems.
Garmin .IMG-files are vector maps. That means that each symbol in your OCAD file must be converted separately to a corresponding symbol in the Garmin map format. The problem in this respect is that there is no standard set of OCAD-symbols. Any OCAD-map may have their own set of symbols and colors, and thus for the conversion to work, you have to make a mapping for each OCAD-symbol in use on a given map. The ocad2img program lets you make this mapping in a straightforward way – but it requires some work to get it exactly right – especially for a map with many “strange” symbols. However, even for a test map with a lot of special symbols, a conversion with good visual results was done in less than 30 minutes.
Step 1: Prepare your OCAD-file
Step one in the procedure is to prepare your OCAD-file. Note that this has only been tested in OCAD9.
- Your OCAD-map must be georeferenced, i.e. each point on the map must be correctly geographically referenced. Many OCAD-maps are already georeferenced. If your map is not georeferenced, one method for doing so using Google Earth is outlined below.
- For the symbol-conversion to work, the OCAD-file must be in OCAD7-format. The OCAD-file itself may be in OCAD9-format, but symbols must be in OCAD7-format. For the remainder of this article, we assume that your original map is saved as example.ocd and that you have loaded this map in OCAD, selected all and pressed delete, and saved the resulting file as example_ocad7.ocd (this saves all symbols and colors to a specific file).
For georeferencing the following procedure will give you a georeferenced map in OCAD 9 (although it might not be accurate enough for all purposes). I have not checked if the same procedure is applicable in OCAD 8 / OCAD 10, but the OCAD people should be able to help you out as this is a job done fairly often:
- Open Google Earth
- Under Layers in the left margin of GE, tick on “Roads” to show the roads layer. Roads are usually accurate even is satellite images are not too good. You may choose to use either roads or the satellite images in the following.
- Under Tools->Settings in GE, set Show Lat/Long to Universal Transverse Mercator
- Go to a point in Google Earth which is on the map and is 100% identifiable (preferably a road crossing or similar). Write down the UTM coordinates of this point – including UTM zone. For my example map, UTM zone is 32 N, and coordinates are given as 298302.22 – 6700857.93
- In OCAD, go to Options -> Scales, and set “Real World coordinates”. Under coordinate system, choose the correct UTM grid (in my case UTM 32N). For Horizontal offset and Vertical offset choose the numbers you found (298302 and 6700857)
- (a) In OCAD, go to Extras -> Transform Map. Click the point you found previously (when the program says click point on map).
- (b) In OCAD, move around the map until the coordinates shown at the bottom of OCAD show the correct values of 298302, 6700857. Tip: It is on a cross!
- Repeat with at least two more points (Find point on Google Earth, write down position, click for map point etc.)
- Press return in OCAD. Now the points are transformed.
- You can check how accurate the transformation is by going over the map with the mouse in OCAD, and observing the transformed coordinates at the bottom of the window in OCAD.
Now you have got a georeferenced map, and can continue to the next step.
Step 2: Download and unzip software
The next step is to download the software you need for the conversion to work. Unfortunately I can not offer all in a single download, as I have not got the rights to do so.
- Ocad2img.zip which includes:
- ocad2img.exe – the converter you should run when you have all files installed. This is a compiled version of a
perl script written by me which is available under the GNU GPL license. The source code is included – free to use and modify according to the GNU GPL license. The perl script is included in the zip-file, and can also be downloaded directly from here. If you want to do modifications to the code, you need a version of perl installed. It has currently only been tested under ActivePerl which you can install from here. Note! This is a hack – the code is not well documented. - ocad2mp.exe including source code. This is a Sourceforge project described as The goal of this project is to develop converter from OCAD map format to open PFM(Polish Map Format) for further use with cGPSmapper compiler. This allows easy use of OCAD maps in Garmin GPS receivers. This is the most important part of the code – ocad2img is actually only a wrapper around ocad2mp which allows you to use custom map types in the Garmin receiver.
- ocad2img.exe – the converter you should run when you have all files installed. This is a compiled version of a
- cgpsmapper (see also download page where you can buy a Pro version with which commercial use of the generated maps is allowed).
- Sendmap.
You now have three zip-files. Unzip all files to the same directory, and you are ready to go. There is no need for any perl install if you don’t want to do modifications to the code.
I have now got the following files in my directory:
- Convert\
- ocad2mp_src\
- ocad2img.pl
- ocad2img.exe
- gpl-3.0.txt
- cgpsmapper.exe
- sendg.dll
- cpreview.exe
- ocad2mp.exe
- sendmap20.exe
- createEXEUploadExample.bat
- filelist.txt
- 10320.TYP
- sort.img
- licence.txt
- symbols.txt
- expired.txt
- 10000012.img
Not all of these files are required, but rather just keep all than erasing some of them.
Step 2: Run ocad2img
Now the OCAD-files are prepared, and all the required software is downloaded. For simplicity, copy your OCAD-files example.ocd and example_ocd7.ocd into the same directory as the program files. Now its time to start ocad2img.exe. In case you have no OCAD-files at hand, you can download example-files example.ocd and example_ocd7.ocd.
When you start ocad2img, you get the following welcome screen:

Here you can read a previous config-file by pressing “Read config” (very useful later on), you can change which file to convert, and so on. The last two input fields – ID of Garmin map and FID of Garmin map – are important. This gives your generated map and symbol set an ID which should be unique to your map. If you will only have one map on the GPS, you can just use the ones given here. If not, you should change these for different maps – I have not presently got details about which values are allowed to use. Each time you run ocad2img a config-file will be saved including the time and date. Reload this to rerun the conversion and change some details.
For our example case with maps called example.ocd and symbols/colors saved in example_ocd7.ocd, you can just click “Continue” to continue the conversion process. You will then get up an overview of all symbols used in your OCAD map. The first column is the OCAD symbol number, the second column is what kind of symbol this is, and the third column is a description of the symbol. The fourth column is an icon showing how this symbol will be represented in your Garmin map.

If you click the icon, you may change the representation of this OCAD map symbol in the Garmin map. E.g. by clicking one of the line symbols, you get up the following dialog:

Here you can choose a new representation. The symbols which you can change to are read from the file symbols.txt. If you want to use ocad2img a lot, you will surely want to make your own symbols.txt file.
When you have finished changing all the symbols you want, click “Start conversion” at the bottom of the page to start the conversion process. For my example map, this results in several files being generated – the important ones being 17360060.img and 10378.TYP. The first of these is the Garmin map file, the second is the TYP-file of the Garmin map describing the custom symbols used in the map. If you would upload only the first of these files to your GPS, you would not get any custom symbols in your map, and your map would not look nice at all.
Step 3: Transfer to your GPS
The last step is to transfer your new Garmin map – including TYP-file – to your GPS. I will list two ways of transferring to your GPS here:
- Works for Garmin Oregon/Dakota/Colorado with new firmware (you must upload the newest firmware version to your device for this to work).
- Run sendmap20.exe which you have in your directory
- Drag both files 17360060.img and 10378.TYP into sendmap20
- Click “Create GMAPSUPP.img”
- Choose a filename for your map. I will call it example.img.
- Transfer the mapfile example.img to your GPS into the “Garmin”-folder via USB (you can download a version of example.img for the example.ocd-map described above – with no changes done whatsoever regarding symbol changes)
- The map should now be available on your GPS when you turn it on – along with all the maps you had there previously. For best result, I usually disable all maps except for the one I am interested in via settings.
- Works for all Garmin GPS units: Use sendmap20 to upload the map to your GPS. Note! This will overwrite all maps you have uploaded to your GPS via Mapsource.
- Run sendmap20.exe which you have in your directory
- Drag both files 17360060.img and 10378.TYP into sendmap20
- Click “Upload maps to GPS”
- The maps should now be available on your GPS when you turn it on. Note that all other maps are overwritten when using this procedure.
It is also possible to make this work via Mapsource – and it is even possible to make a installer which automatically installs the map in Mapsource / on your GPS, but that is beyond the scope of this article.
Acknowledgments
Thanks to Gjensidigestiftelsen and the Norwegian Orienteering Federation who supported this work. Thanks also to Richard Hensby for many discussions and tips regarding the conversion of OCAD maps to Garmin IMG maps. And thanks to the developers of ocad2mp – without which this would had not been possible.
In the future, Varegg will probably use the new custom raster map features on the Oregon GPS (to be described in the next article in this series) instead of IMG-maps / vector maps, as the procedure is much simpler for raster maps – and also the maps on the GPS will look exactly like the orienteering map you have in your hand. Still, the procedure described above will come in useful in some cases.

Dette var interessant:)
Kommer det kokebok på hvordan man kan få o-kart på TomTom bil GPSer også ?
Kan TomTom lese Garmins .img filer?
@Fast: I don’t know anything about TomTom car GPS units, they probably do not use Garmins map format. Car GPS units is not the main priority here anyway, as our main goal was to get orienteering maps on rugged water-proof units compatible with the rather wet Bergen climate…
Thank you Jan. This is just great. I just tried to upload the sample map to my Garmin etrex Vista Cx. The result is not what I anticipated. Maybe the described process does not work with eTrex series. Seehttp://www.facebook.com/photo.php?pid=3951023&id=133539794675&comments&ref=nf-> It works now, see below
I uploaded the latest Garmin Vista software and it works now!
Some comments from Olle’s at Facebook:
1. Ales Henja:
I managed successfuly to upload the sample o-map to my eTrex Vista (see picture bellow). I tried to process some of my own maps. But at the end of the ocad2img I get this error message: “Error E032: Layer 0 of the map cannot be empty”.
2. Richard Valentine Hensby
I have had that error before. Typically when I forgot to go to Options -> Scales, and set “Real World coordinates”. Under coordinate system, choose the correct UTM grid (in my case UTM 32N).
3. Richard Valentine Hensby
Before Jan worked his magic, I had to define every ocad symbol as a bitmap. Jan’s software translates the bit map that is associated with a symbol automatically. Works a treat for 99% of symbols. For line symbols that OCAD depicts with a fancy icon (eg 530.0) or where lines are shown as vertical icons (eg 601.0) you get some odd results. To tidy … Read Morethese up you need to right click on the icon in ocad7 file and edit it’s bit map to be a horizontal line (for 530.0 you can leave gaps in it, for 601.0 make a solid line). Next time you do the conversion it will be a lot tidier. Applying this technique to those odd symbols in the out of bounds area in your screen shot above would be very effective.
4. Richard Valentine Hensby
Pits and small depressions show as upside down for me. Could be because I am “down under” in NZ. I find them quite quaint, so have left them. But could easily be fixed by editing the bit map of the icon in the ocad7 file
5. Richard Valentine Hensby
Just had a quick look at this Meyermarken file and what I did to sort out the anomalies you see on your screen shot. In the ocad7 file redraw the icons for 601.1, 526.4 and 526.5 as horizontal lines. This sorts out the North Line, the building outlines and the canopy outlines. Redraw the 529.2 icon as it is but horizontally instead of vertically. This sorts out the steps that are to the west of the western building.
6. Olles Maps
Thank you Richard! I did not know it uses the bitmap icons. Interesting. With this knowledge I can do some tidying.
All from http://www.facebook.com/pages/Olles-Maps/133539794675
Comment by email:
After spending some time on the procedure and with help from Simon (my son) we have been able to download an Ocad 10 map (duly saved as Ocad 9 and Ocad 7 as per instructions), and using Step 2 transfer the image to a Garmin CSx. The image is OK but not as good as the image shown in the conversion article.
We tried Step 1 but as indicated did not work so had to overwrite other maps by using Step 2, although the CSx has the option to change the micro card. Hence keen to find out how to download with Mapsource and checking out how to download without overwriting other maps, such as the Shonky maps which I find to be pretty good for general coverage of Australia.
I had been researching the procedure and found that Martin Lergen from Germany had also been able to do the conversion, but coincidentally he has just informed me of Jans work saying this is a much better and simpler procedure. And I agree.
Well done Jan, great work.
My answer to comment by email:
I’m not 100% sure if I understand what works/doesn’t work – but I think what you are saying is that you’ve got your OCAD-map converted to a Garmin map (.img-file with accompanying .typ file), and the problem is how to transfer it to your GPS-unit without erasing other maps, i.e. doing it through Mapsource?
I’ve been using a program called MapSetToolKit for this (instructions here http://cypherman1.googlepages.com/intruction_en and download here http://www.box.net/index.php?rm=box_v2_download_shared_file&file_id=f_274264738 ) to transfer maps to Mapsource. There are also some instructions here http://www.gpsfiledepot.com/tutorials/how-to-load-.img-files-into-mapsource-with-mapsettoolkit/ , and it is even possible to make a self-extracting exe-file for the map which you can send to somebody else http://www.gpsfiledepot.com/tutorials/how-to-create-garmin-topo-maps—part-9—compiling-data/ (I’ve not tried the latter). It is a bit involved process, and you might need to have an older version of Mapsource installed (although I am not completely sure about that).
TO PREPARE A GARMIN MAP FOR MAPSOURCE
The process automatically edits your registry, you may like to take a backup of it and/or set a system restore point before continuing.
Add a directory to your C:\ drive to hold the mapsource files. For example C:\WG
Put MapsetToolkit.exe on your C:\
Double click on MapsetToolkit.exe on your C:\
Click on Select IMG files and select the folder where your IMG file is. That will populate the Source IMG files space.
Click on the img file you want in MapSource and then click on Add.
Fill in the directory where the program will assemble the bits and pieces it needs for Mapsource (in this example C:\WG\
Fill in Mapset name with the name you want to see in
Mapsource.
Put in a famlily ID greater than 65530 (Product code and Map version will default, leve copyright info blank.
Fill in the name of the compiled TYP file you want to use. Jan will be able to tell you what this will be called and where it will be stored.
Remember to tick “Install in Mapsource” then click start.
A message will appear, click on Yes.
If you want to remove a map from mapsource. Then select it in the mapset installed panel and click on uninstall.
DOWNLOAD FROM MAPSOURCE TO GPS
Go into Mapsource. Your custom map should be in the list of maps. It looks a bit strange in Mapsource but don’t panic, it will look better on the GPS.
Download the map to your gps using the normal mapsource functions to select it and transfer it. NB you need to select all maps that you want on the GPS as Mapsource clears all maps from the GPS as it’s first step.
Ooops, just followed some of Jan’s previous links on using mapsettoolkit, much better than my notes. Please ignore mine.
BTW
I found that I could not use custom maps on versions of Mapsource that were higher than 6.13.7. This was some time ago, so the very latest version of Mapsource may work with custom maps.
@fast: For TomTom there might be possibilities via this article,
http://freegeographytools.com/2009/raster-maps-on-a-tomtom-gps
For direct georeferenced OCAD to Garmin Custom Map, see this tool:
http://moagu.com/?page_id=155
(I think you’ll need OCAD professional to export GeoTIFF or jpg with world files)